Ruby 2.4 对哈希表引入了一些性能改进,这些变化是 Vladimir Makarov 在 2016 年初向 Ruby Hash 提交补丁时提出的
这篇文章简单介绍一下 Ruby 哈希表的基础和 2.4 改变
Ruby 是如何实现哈希表的
我们从用数组实现哈希表开始,起名叫 TurboHash:
class TurboHash
  attr_reader :table

  def initialize
    @table = []
  end
end
我们使用@table数组保存条目,然后添加方法去设置和读取条目:
class TurboHash
  def [](key)
    find(key).last
  end

  def find(key)
    # 遍历数组查找对应的条目
    @table.find do |entry|
      key == entry.first
    end
  end

  def []=(key, value)
    if entry = find(key)
      entry[1] = value
    else
      @table << [key, value]
    end
  end
end
写个 benchmark 来对比一下原生 Hash 的性能
require "benchmark"

legacy = Hash.new
turbo  = TurboHash.new

n = 10_000

def set_and_find(target)
  key = rand
  target[key] = rand
  target[key]
end

Benchmark.bm do |x|
  x.report("Hash: ") { n.times { set_and_find(legacy) } }
  x.report("TurboHash: ") { n.times { set_and_find(turbo) } }
end
很惨,在我的电脑上,比原生的慢了 1000 倍
       user     system      total        real
Hash:   0.010000   0.000000   0.010000 (  0.004094)
TurboHash:  10.070000   0.050000  10.120000 ( 10.240642)
瓶颈在于到后面查找条目的时候,每次都要遍历近万个条目,很明显,原生的 Hash 不是通过遍历数组这种方式来实现的。
在 Ruby 2.4 之前,Ruby 采用的是哈希值链表法
一个对象在被放置入哈希表之前,会调用它的 hash 方法得到一个整数,然后对整数取模,获取它所在节点,如果这个节点为空,则在这个节点创建一个链表,将这个对象放置入链表,反之则添加到这个链表。
我们用这个方法来改一下之前的 TurboHash
class Node
  attr_reader :object, :next

  def initialize(o, n)
    @object = o
    @next = n
  end
end

class TurboHash
  NUM_BINS = 11

  attr_reader :table

  def initialize
    @table = Array.new(NUM_BINS)
  end

  def [](key)
    if node = node_for(key)
      begin
        return node.object[1] if node.object[0] == key
      end while node = node.next
    end
  end

  def node_for(key)
    @table[index_of(key)]
  end

  def index_of(key)
    key.hash % NUM_BINS
  end

  def []=(key, value)
    @table[index_of(key)] = Node.new([key, value], node_for(key))
  end
end
再来运行一下 benchmark,不敢相信自己的眼睛,已经和原生 Hash 一样快了??只是把原先一个大数组遍历,改成了分开用 11 个格子分开存储,然后用链表遍历,理论上性能应该只是变快了 11 倍左右:
       user     system      total        real
Hash:   0.010000   0.000000   0.010000 (  0.003859)
TurboHash:   0.010000   0.000000   0.010000 (  0.014998)
真相是我这里特别针对 benchmark 的代码作弊了,每次往链表添加对象的时候,都加到了链表的最前面,而 benchmark 代码每次都是读取最后添加对象的 key,不用遍历整个链表,自然会很快,如果把 benchmark 代码修改一下:
def set_and_find(target)
  keys = Array.new(30000) {rand}
  keys.each do |key|
    target[key] = rand
  end.shuffle.each do |key|
    target[key]
  end
end
和单数组遍历相比,性能确实只提高了一个数量级,从慢 1000 倍变成慢 100 倍,这也从一个侧面说明了单一或者简单的性能测试代码都是骗人的 ^_^
       user     system      total        real
Hash:   0.020000   0.000000   0.020000 (  0.019680)
TurboHash:   2.360000   0.010000   2.370000 (  2.375549)
现在瓶颈在放置入 Hash 中的对象变多以后,数组对应元素的链表会变长,每次读取的时候,都要遍历。如果随着对象增加进行扩容,可以解决这个瓶颈。
让我们抄袭一下 Ruby 的源代码,再来改进 TurboHash:
class TurboHash
  STARTING_BINS = 16

  attr_reader :table

  def initialize
    @max_density = 5
    @entry_count = 0
    @bin_count   = STARTING_BINS
    @table = Array.new(@bin_count)
  end

  def grow
    @bin_count = @bin_count << 1
    new_table = Array.new(@bin_count)
    @table.each do |node|
      if node
        begin
          new_index = index_of(node.object[0])
          new_table[new_index] = Node.new(node.object, new_table[new_index])
        end while node = node.next
      end
    end
    @table = new_table
  end

  def full?
    @entry_count > @max_density * @bin_count
  end

  def [](key)
    if node = node_for(key)
      begin
        return node.object[1] if node.object[0] == key
      end while node = node.next
    end
  end

  def node_for(key)
    @table[index_of(key)]
  end

  def index_of(key)
    key.hash % @bin_count
  end

  def []=(key, value)
    grow if full?
    @table[index_of(key)] = Node.new([key, value], node_for(key))
    @entry_count += 1
  end
end
通过一个 entry_count 计数器来统计 Hash 表里的元素个数,当超过一定数量的时候,通过 grow 方法进行扩容,这里初始的 16 个数组个数和平均 5 个密度,都是从 Ruby 源代码中抄过来的。我们再来看一下性能测试结果:
       user     system      total        real
Hash:   0.020000   0.000000   0.020000 (  0.021225)
TurboHash:   0.090000   0.000000   0.090000 (  0.088481)
已经差不多在一个数量级了,这也基本上就是 Ruby 2.4 之前的 Hash 实现方法,当然实际的原生 Hash 实现代码要比这个复杂很多,还要考虑删除元素,扩容机制的优化,以及一些小细节优化。
Ruby 2.4 之前的 2 个小细节优化
2.0 时候针对小于 7 个元素的 Hash 不额外创建链表结构,直接放置入数组,用数组遍历来实现,我们可以从性能测试代码中看到,达到 7 个元素的时候,性能有个阶梯式的差异:
require 'benchmark/ips'
Benchmark.ips do |x|
  3.upto(10) do |i|
    x.report(i) do
      h = {}
      i.times do |j|
        h[j.to_s] = j
      end
    end
  end
end
2.2时候,得益于Object#hash方法的改进,hash值更加均匀分布,从质数取模改成了用位操作:
def index_of(key)
  key.hash & @bin_count - 1
end
Ruby 2.4 Hash 的改变
Ruby 2.4 采用了Open addressing改进 Hash 的性能,和之前的实现方法差异主要在于:不再额外维护一个链表结构,每次都是按 hash 索引在数组插入,如果要插入的位置已经有元素存在,那么就找到一个空的位置插入。
这种做法称为线性探测,上图中用的就是最简单的 +1 依次探测,但是这种实现在元素较多的时候,每次插入和读取时,都很容易发生索引已经被占用的情况,然后要依次遍历,性能很差
Ruby 2.4 采用了随机探测 ( Random Probing ) 来解决这个问题,最简单随机探测实现方法就是加一个伪随机值来探测下一个空位,伪随机值的作用是保证读取的时候随机值和放置时候一样,不会有性能问题。
类似 Random,伪随机值就是给定一个起始的数值,每次产生的随机数顺序都是一样的:
irb> r = Random.new(7)
irb> r.rand(1..100)
# => 48
irb> r.rand(1..100)
# => 69
irb> r.rand(1..100)
# => 26

irb> r = Random.new(7)
irb> r.rand(1..100)
# => 48
irb> r.rand(1..100)
# => 69
irb> r.rand(1..100)
# => 26
Ruby 2.4 采用了线性同余方法来实现一个伪随机值队列:
Xn+1 = (a * Xn + c ) % m
只要满足如下 4 个条件,这个算法就可以产生伪随机值队列:
- m > 0
- 0 < a < m
- 0 <= c < m
- 0 <= X0 < m
我们选取 a=3, c=1, m=16 来试试看:
irb> a, x_n, c, m = [3, 1, 4, 16]

irb> x_n = (a * x_n + c) % m
 => 7
irb> x_n = (a * x_n + c) % m
 => 9
irb> x_n = (a * x_n + c) % m
 => 15
irb> x_n = (a * x_n + c) % m
 => 1
但是在上面的 a,c,m 初始值的选择下,这个队列在获取了 4 次随机值之后就开始循环了,达不到依次遍历所有位置(0 到 m)的需求。
只要通过选择不同的 a,c,m 初始值,满足一定条件,是可以实现了完整周期线性同余方法(Full Cycle Linear Congruential Generator)
- m 和 c 互质
- (a - 1) 能被 m 的所有质因数整除
- 如果 m 能被 4 整除,那么 (a - 1) 也必须能被 4 整除
源码中,是采用了这样的数据 a=5, c=1, m 为 2 的 N 次方( https://github.com/ruby/ruby/blob/trunk/st.c#L801 )
我们来试一下:
irb> a, x_n, c, m = [5, 7, 1, 16]

irb> x_n = (a * x_n + c) % m
# => 4
irb> x_n = (a * x_n + c) % m
# => 5
irb> x_n = (a * x_n + c) % m
# => 10

irb> (1..16).map { x_n = (a * x_n + c) % m }.sort
# => [0, 1, 2, 3, 4, 5, 6, 7, 8, 9, 10, 11, 12, 13, 14, 15]
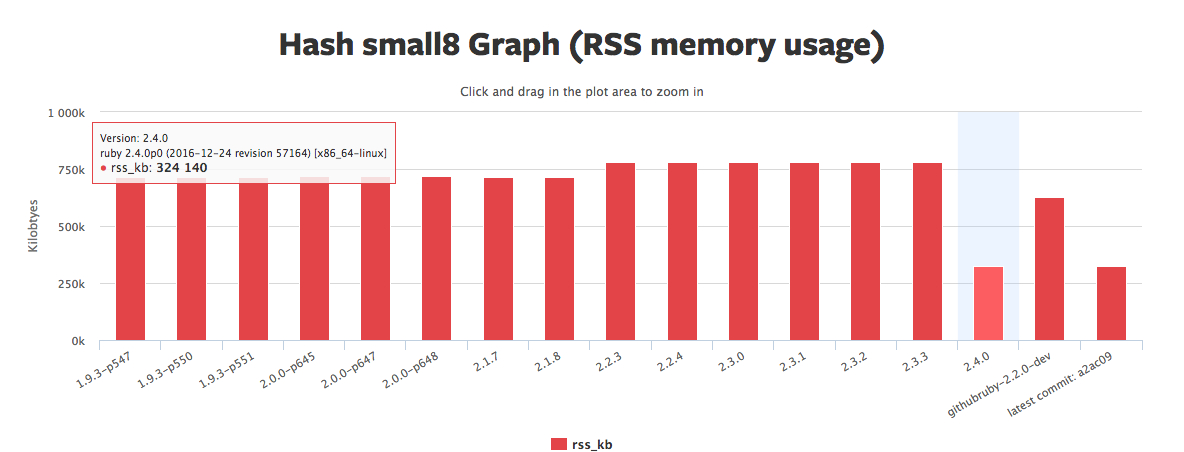
正是通过 Open addressing 避免了额外的数据结构,所以 Ruby 2.4 Hash 的内存使用减少了:

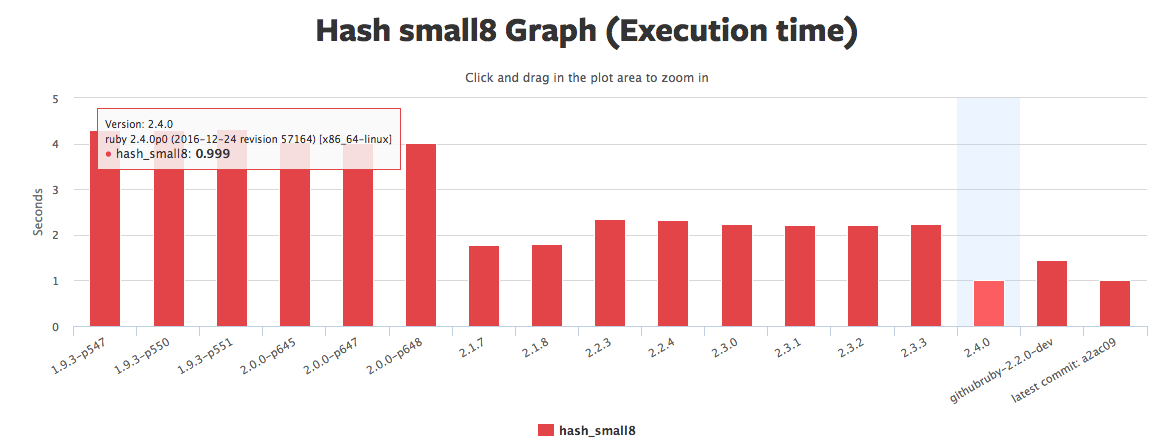
然后通过完整周期线性同余方法,保证所有对象尽可能在内存中是相邻存放,CPU 在读取内存时,会预读取同一区块的相邻数据到 CPU 缓存,所以 Ruby 2.4 Hash 的性能也有了很大提高:

数据来源:https://rubybench.org/ruby/ruby/releases?result_type=hash_small8
最后,本文基本上是以下两篇文章的翻译和改编:
https://blog.heroku.com/ruby-2-4-features-hashes-integers-rounding#hash-changes
http://blog.redpanthers.co/behind-scenes-hash-table-performance-ruby-2-4/
最后的最后,如果你有几个小时来阅读 2.4 Hash 的这个补丁会发现有很多有趣的内容

