Ruby 用 Github Actions 持续整合 Rails
dev.to 版 https://dev.to/kevinluo201/github-actions-ruby-on-rails-42ig
最近研究了一下用 Github Actions 做 Rails 的 CI,分享一下经验 : )
Github Actions 是 Github 的自动化工具。
Github Actions 只要在你的专案根目录新增 .github/workflows ,再新增任意名称的 Yaml 档。
Git push 到 Github 后,即会根据你写的 workflow 的内容自动执行了。
可以直接看下面分享的 YAML 档,不过建议还是先看一下 Github Action 的文档 Introduction to GitHub Actions - GitHub Docs ,会比较有概念喔 (常常更新的也满快的)
先分享 .github/workflows/ci.yml,后面会再说明每一列是代表什麽意思
name: CI
on: [push, pull_request]
jobs:
  build:
    runs-on: ubuntu-latest
    steps:
      - uses: actions/checkout@v1
      - name: Setup Ruby
        uses: ruby/setup-ruby@v1
        with:
          ruby-version: 2.7.2
          bundler-cache: true
      - name: Install Node
        uses: actions/setup-node@v2
        with:
          node-version: '12.16.x'
      - name: Restore cached ./node_modules
        uses: actions/cache@v2
        with:
          path: ./node_modules
          key: ${{ runner.os }}-yarn-lock-${{ hashFiles('./yarn.lock') }}
          restore-keys: |
            ${{ runner.os }}-yarn-lock-
      - name: Yarn Install
        run: yarn install
  test:
    needs: build
    runs-on: ubuntu-latest
    services:
      mysql:
        image: mysql:8
        ports: ['3306:3306']
        env:
          MYSQL_ROOT_PASSWORD: 'my-root-pw'
          MYSQL_DATABASE: test_db
          MYSQL_USER: username_you_like
          MYSQL_PASSWORD: password_you_like
        options: --health-cmd="mysqladmin ping" --health-interval=10s --health-timeout=5s --health-retries=3
      redis:
        image: redis
        ports: ['6379:6379']
        options: --entrypoint redis-server
    steps:
      - uses: actions/checkout@v1
      - name: Setup Ruby
        uses: ruby/setup-ruby@v1
        with:
          ruby-version: 2.7.2
          bundler-cache: true
      - name: Install Node
        uses: actions/setup-node@v2
        with:
          node-version: '12.16.x'
      - name: Restore cached ./node_modules
        uses: actions/cache@v2
        with:
          path: ./node_modules
          key: ${{ runner.os }}-yarn-lock-${{ hashFiles('./yarn.lock') }}
          restore-keys: |
            ${{ runner.os }}-yarn-lock-
      - name: Yarn Install
        run: yarn install
      - name: Prepare Database
        env:
          RAILS_ENV: test
          RAILS_MASTER_KEY: ${{ secrets.RAILS_MASTER_KEY }}
        run: bundle exec rails db:prepare
      - name: Run tests
        env:
          REDIS_URL: redis://localhost:6379/1
          RAILS_ENV: test
          RAILS_MASTER_KEY: ${{ secrets.RAILS_MASTER_KEY }}
        run: |
          bundle exec rspec --format RspecJunitFormatter --out ./reports/rspec.xml
      - name: Publish Test Report
        uses: mikepenz/action-junit-report@v2
        with:
          report_paths: './reports/rspec.xml'
说明
name: CI
此 workflow 的名称,可任意取,到时会出现在 Github Actions 中
on: [push, pull_request]
on 是控制何时要执行这个 workflow
- push: 有 commit push 时
- pull_request: PR 更新时
jobs:
  build:
    runs-on: ubuntu-latest
一个 workflow 可以有很多 jobs 组成,它们通常是同时 (平行) 执行的,
不过可以设定先后顺序,下面一点会提到。
job 的名称可任意取名,我这裡叫它 build
runs-on 是 job 要在什麽 OS 上执行,github 上的 Github Actions 好像得用 ubuntu-latest,我也是照教学沿用了
steps:
step 是 Github Actions 的最小单位
steps 裡每个 step 可以执行一或多个指令或一个 Action
要执行指令,则使用 run
run: echo "hello world!"
要执行 Action,用 uses
uses: actions的名字
每个 step 的 name 并不是必填,但填了就像註解一样,方便理解
- uses: actions/checkout@v1
Action 其实就预先写好的脚本
GitHub Marketplace 上有一堆,可以想像是想把自动化的脚本当成在 App Store 上卖
GitHub Marketplace · Actions to improve your workflow · GitHub
actions/checkout@v1 就是一个常用的 Action,可以把你的 git repository 下载下来
- name: Setup Ruby
  uses: ruby/setup-ruby@v1
  with:
    ruby-version: 2.7.2
    bundler-cache: true
ruby/setup-ruby@v1 是用来安装 Ruby 的 Action 下载的 ruby-version: 2.7.2 是要装 2.7.2 的 Ruby bundler-cache: true 是要快取 bundler 下载的 gem,下面再说明快取 基本上这些 Action 都可以在 Github Marketplace 上查到用法 Setup Ruby, JRuby and TruffleRuby · Actions · GitHub Marketplace · GitHub
- name: Install Node
  uses: actions/setup-node@v2
  with:
    node-version: '12.16.x'
同上,安装 Node
- name: Restore cached ./node_modules
  uses: actions/cache@v2
  with:
    path: ./node_modules
    key: ${{ runner.os }}-yarn-lock-${{ hashFiles('./yarn.lock') }}
    restore-keys: |
      ${{ runner.os }}-yarn-lock-
- name: Yarn Install
  run: yarn install
actions/cache@v2 是专门来做快取的 Action
这裡写 path: ./node_modules 就是要把 ./node_modules 下的档案全 cache 起来
快取的结果会用 key 的设定去命名。
这个 action 会先依照 restore-keys 去找可以回復的快取
最后的 step 纯粹就是跑 yarn install
如果光看这个 顺序应该有人会疑惑: 快取的 action 是放在 yarn install 前,或更上方 ruby 的部分有 bundle install 前, 在安装依赖前,先「读取」快取好理解, 但重要的是「存」快取的时机怎麽没看到? 执行一次就知道,这类快取的 Action 都有挂个动作在 PostJob 的 callback, 当这个 job 结束后会把该快取的 path 存起来
另外,每个仓库有 5GB 的快取空间,正常来说应该是用不完啦。 所以 gems, npm 这种安装的程式库都把它们快取起来吧
test:
  needs: build
  runs-on: ubuntu-latest
这是第二个 job,我命名为 test,因为准备要跑 rspec 了
上面说 job 其实是平行执行的,needs 可以控制先后顺序,needs: build 的意思就是 build 跑完才会跑 test
虽然以目前这个 workflow 来看,其实可以把 steps 全写在同一个 job,没什麽差别。
但写成这样,可以方便未来加入不同类的 test,比如 js 的 test,capybara 的 test,可以在 build 后,所有的 test 同时执行。
services:
  mysql:
    image: mysql:8
    ports: ['3306:3306']
    env:
      MYSQL_ROOT_PASSWORD: 'my-root-pw'
      MYSQL_DATABASE: test_db
      MYSQL_USER: test_user
      MYSQL_PASSWORD: test_pw
    options: --health-cmd="mysqladmin ping" --health-interval=10s --health-timeout=5s --health-retries=3
  redis:
    image: redis
    ports: ['6379:6379']
    options: --entrypoint redis-server
services 可以用 docker image 架起需要用的服务,设定好 port mapping
我这裡架了 mysql 和 redis
那些 env 是去 DockerHub 上去找官方的 image 的说明才知道有什麽可以加的
顺带一提,CI 时 config/database.yml 可以两种处理方式
- 直接加入 git,内容再用 ENV 去替换
- 新增一个 database.yml.ci,在 workflow 裡加一个 step 去
run: cp config/database.yml.ci config/database.yml
steps:
  - uses: actions/checkout@v1
  - name: Setup Ruby
    uses: ruby/setup-ruby@v1
    with:
      ruby-version: 2.7.2
      bundler-cache: true
  - name: Install Node
    uses: actions/setup-node@v2
    with:
      node-version: '12.16.x'
  - name: Restore cached ./node_modules
    uses: actions/cache@v2
    with:
      path: ./node_modules
      key: ${{ runner.os }}-yarn-lock-${{ hashFiles('./yarn.lock') }}
      restore-keys: |
        ${{ runner.os }}-yarn-lock-
  - name: Yarn Install
    run: yarn install
这裡跟 build 是做完全一模一样的事,执行时会直接取 build 快取的结果,所以很快就会跑完。 看起来很冗,不过如果未来可以用 YAML 的 Anchor 功能,这一块可以直接写成一个可複用的 block,目前就直接重複吧!
- name: Prepare Database
  env:
    RAILS_ENV: test
    RAILS_MASTER_KEY: ${{ secrets.RAILS_MASTER_KEY }}
  run: bundle exec rails db:prepare
如果要开始跑 rails 的指令时,要带一些环境变数时,例如我这样会用 RAILS_ENV 跟 RAILS_MASTER_KEY
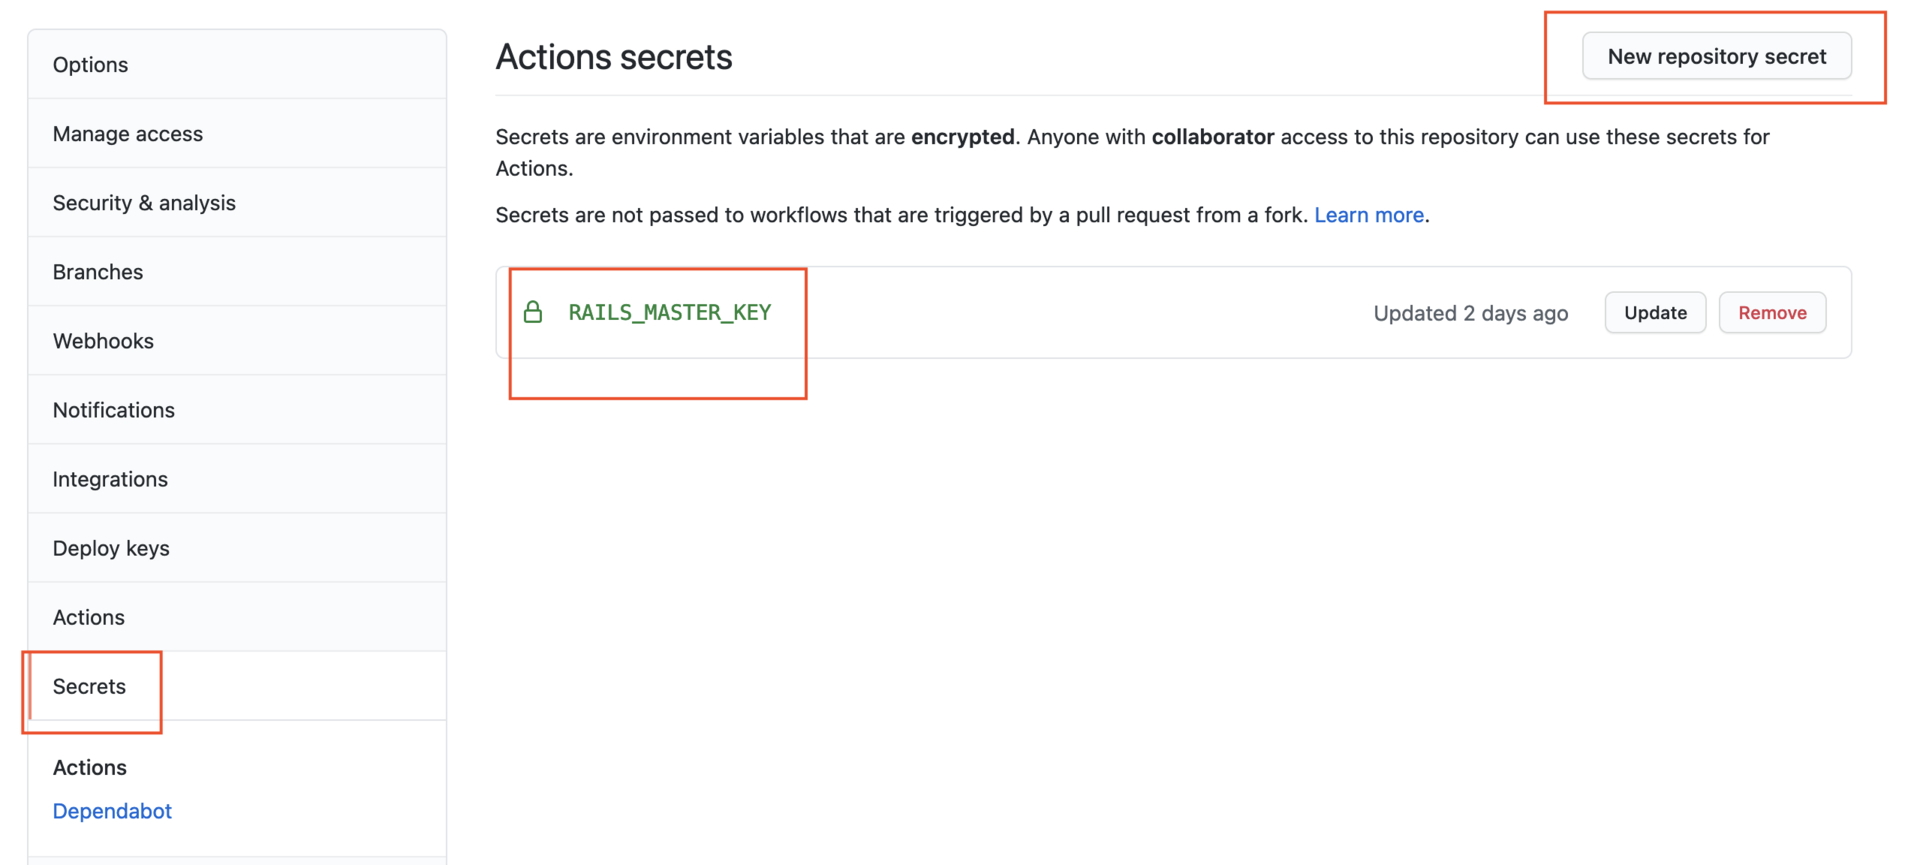
是密码类的字串可以存在 Github 仓库 >Settings>Secrets 裡,workflow 裡可以直接 secrets.RAILS_MASTER_KEY 去读取
- name: Run tests
  env:
    REDIS_URL: redis://localhost:6379/1
    RAILS_ENV: test
    RAILS_MASTER_KEY: ${{ secrets.RAILS_MASTER_KEY }}
  run: bundle exec rspec --format RspecJunitFormatter --out ./reports/rspec.xml
这边是跑 rspec 有装 rspec_junit-formatter,所以可以产生一个 XML 档纪录测试结果
- name: Publish Test Report
  uses: mikepenz/action-junit-report@v2
  with:
    report_paths: './reports/rspec.xml'
最后用 mikepenz/action-junit-report@v2
去读取 XML 的测试结果并秀出在页面上

心得
我觉得自动化最烦的就是一堆小细节要顾,
比如说也可以完全不快取硬让它跑,但就会很慢。
像 CircleCI 的 orb 就是把每个语言、框架常用的自动化指令整理起来变成一组指令集。
但 Github Actions 直接更进一步让社群製作指令集,并准备好市集,方便搜寻跟分享,野心勃勃要干掉其它 CI。
整体上还满容易用,连 Rails 都能轻易导入 (回想一下把 Rails 装进 Docker 的夜晚),满推荐试试看的。
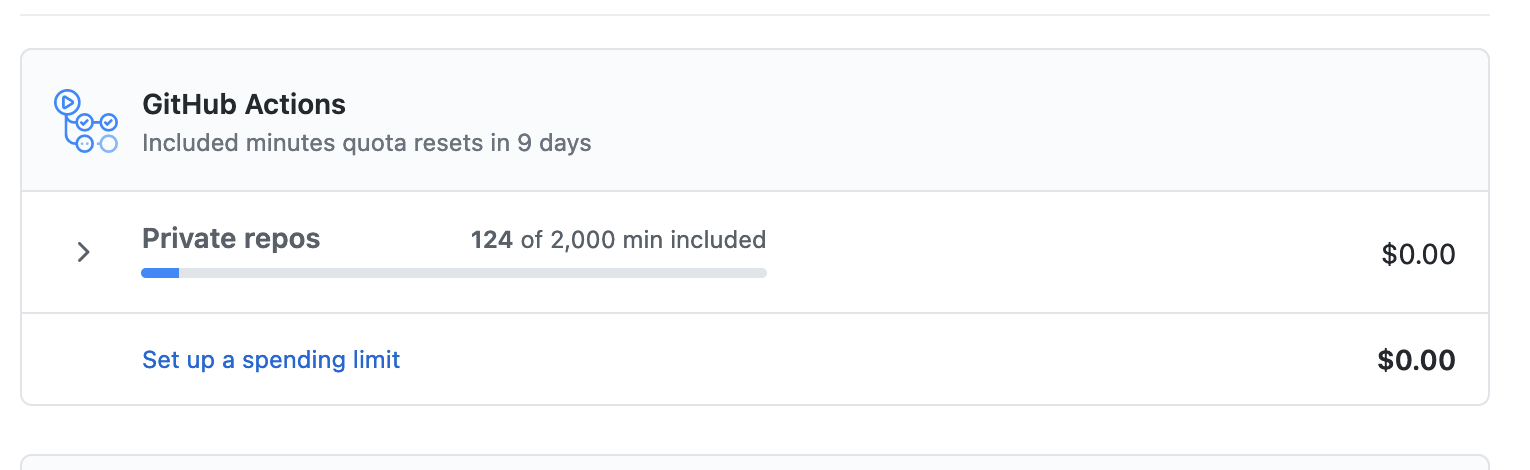
而且 Github(微软) 满佛的,每个月给 2000 小时,个人练习或小型专案应该是用不完啦,可以去帐号 Billing & Plans 下查用量。
 最后还是自建。