Rails 快速搭建自定义域名的 Rails 5 HTTPS 开发服务器
https 已经是大势所趋,越来越多的 Web API 调用依赖 HTTPS 环境,苹果公司也要求其 ios App 强制使用 https。本人想写点个微信小程序玩下,发现也得用 https 才好使。微信小程序服务器只支持 https
研究了一下如何在 rails 开发的时候开启 https,最终发现使用 nginx 开启反向代理是最简单可行的办法,曾经试过用 rails s -b 'ssl://localhost:3000?key=path/to/file/localhost.key&cert=path/to/file/localhost.crt'来开启 https, 用倒是能用,就是后台错误一大堆。
本人开发环境
- Rails 5.1.4
- Mac OS X 10.12.5 (El Capitan)
- OpenSSL 1.0.2l(brew install openssl)
- nginx 1.12.2
- Google Chrome 64.0.3282.140 (64-bit)
生成根证书
openssl req -x509 -sha256 -nodes -newkey rsa:2048 -days 365 -keyout server.key -out server.crt
填写有关项,想省事儿的话只需要填写 Common Name, 比如使用星号开头的*.blog.me。
Generating a 2048 bit RSA private key
..............+++
.........................................................................................+++
writing new private key to 'server.key'
-----
You are about to be asked to enter information that will be incorporated
into your certificate request.
What you are about to enter is what is called a Distinguished Name or a DN.
There are quite a few fields but you can leave some blank
For some fields there will be a default value,
If you enter '.', the field will be left blank.
-----
Country Name (2 letter code) [AU]:
State or Province Name (full name) [Some-State]:
Locality Name (eg, city) []:
Organization Name (eg, company) [Internet Widgits Pty Ltd]:
Organizational Unit Name (eg, section) []:
Common Name (e.g. server FQDN or YOUR name) []:*.blog.me
Email Address []:[email protected]
会生成两个文件:证书文件 server.crt 和密钥文件 server.key,下面的 nginx 中会用到
设置 hosts 添加自定义域名
打开/etc/hosts 文件,添加此句:
127.0.0.1 1.blog.me
建议使用免费的 hosts 管理工具:SwitchHosts: 点击下载
启动 Rails 开发服务器
rails server -b 0.0.0.0 -p 3000
设置 nginx
- 安装 nginx:
bash brew install nginx - 修改 nginx 配置,配置文件位于:/usr/local/etc/nginx/nginx.conf
worker_processes  1;

events {
    worker_connections  1024;
}

http {
    include       mime.types;
    default_type  application/octet-stream;

    #log_format  main  '$remote_addr - $remote_user [$time_local] "$request" '
    #                  '$status $body_bytes_sent "$http_referer" '
    #                  '"$http_user_agent" "$http_x_forwarded_for"';

    #access_log  logs/access.log  main;

    sendfile        on;
    #tcp_nopush     on;

    #keepalive_timeout  0;
    keepalive_timeout  65;

    #gzip  on;

    server {
        listen       8080;
        server_name  localhost;

        #charset koi8-r;

        #access_log  logs/host.access.log  main;

        location / {
            root   html;
            index  index.html index.htm;
        }

        #error_page  404              /404.html;

        # redirect server error pages to the static page /50x.html
        #
        error_page   500 502 503 504  /50x.html;
        location = /50x.html {
            root   html;
        }

    }
    # HTTPS server
    server {
        listen       4433;
        server_name  1.blog.me;

        ssl                  on;
        ssl_certificate      server.crt;
        ssl_certificate_key  server.key;
        ssl_session_timeout  5m;

        ssl_protocols TLSv1 TLSv1.1 TLSv1.2;
        ssl_ciphers  HIGH:!aNULL:!MD5;
        ssl_prefer_server_ciphers   on;

        location / {
          proxy_pass          http://127.0.0.1:3000;
          proxy_set_header    Host             $host;
          proxy_set_header    X-Real-IP        $remote_addr;
          proxy_set_header    X-Forwarded-For  $proxy_add_x_forwarded_for;
          proxy_set_header    X-Forwarded-Proto https;
        }
    }
    include servers/*;
}
其中的 HTTPS server 就是相关的 https 配置,端口号设置为 4433,因为默认的 443 是被 mac 系统屏蔽的。server_name 就填咱们的自定义域名:1.blog.me。ssl_certificate 对应的是证书文件,ssl_certificate_key 则是你的密钥文件。在 location 中的 proxy_pass 设置的是反向代理地址,也就是本机的 rails 开发服务器地址,其它照搬即可。配置好后建议使用 sudo nginx -t 测试下避免有写错的情况。
使用 brew services restart nginx 来重启 nginx!
信任证书
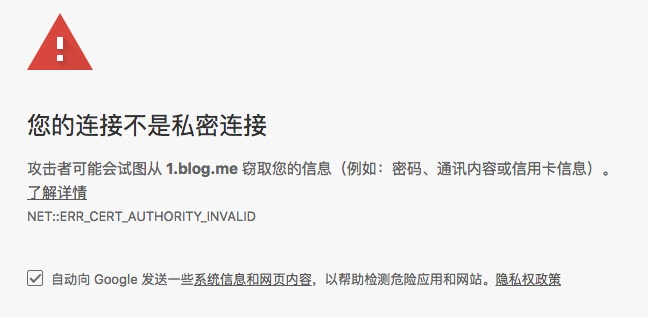
使用浏览器打开https://1.blog.me:4433 后会告诉你 authority invalid
此时打开 developer tools
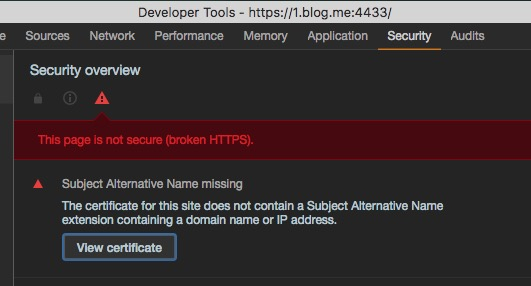
点击 View certificate
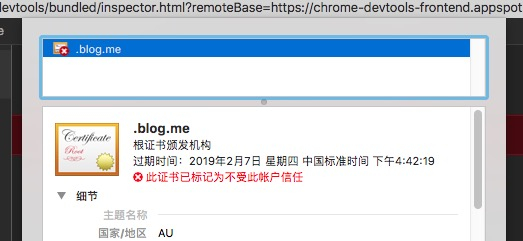
拖动证书图标到桌面生成证书文件,并双击打开

设置始终信任,输入超级用户密码后确认
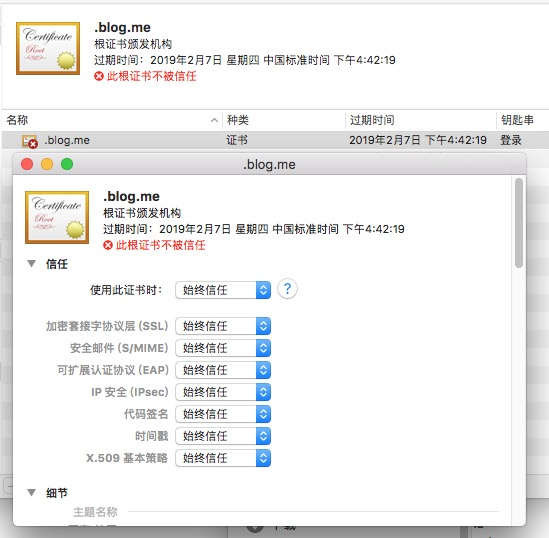
一切正常的话应该是这样:
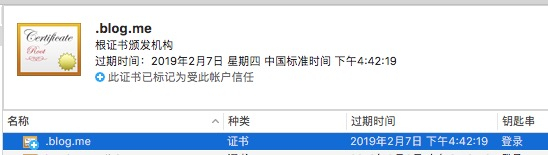
小成功
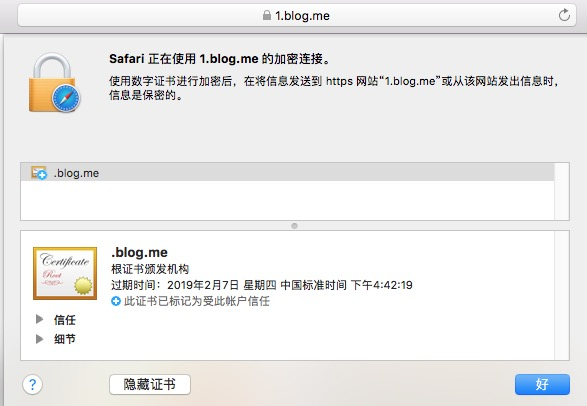
通过 safari 来访问是 OK 的
chrome 会报错(老版本的 chrome 反倒不会):
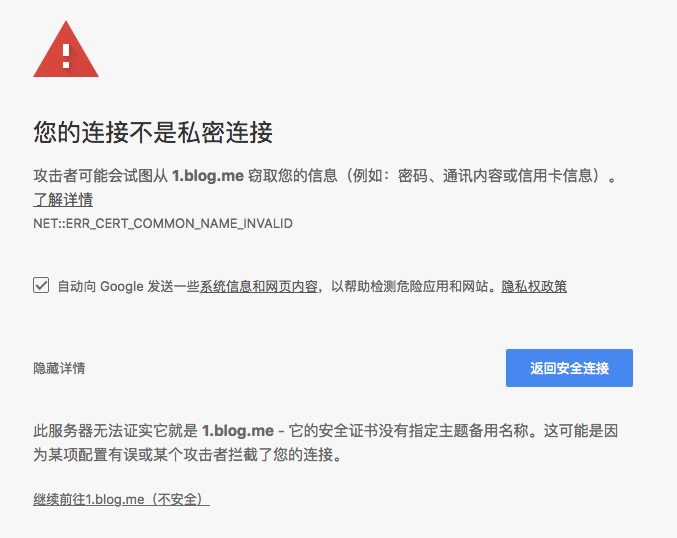
可以点击高级中的继续前往来访问网站,只是左边会显示不安全:
chrome 出错是因为其已经不再支持证书中的 commonName 匹配,实际上,自 2017 年 1 月起需要 subjectAltName 这个规则了。
解决办法
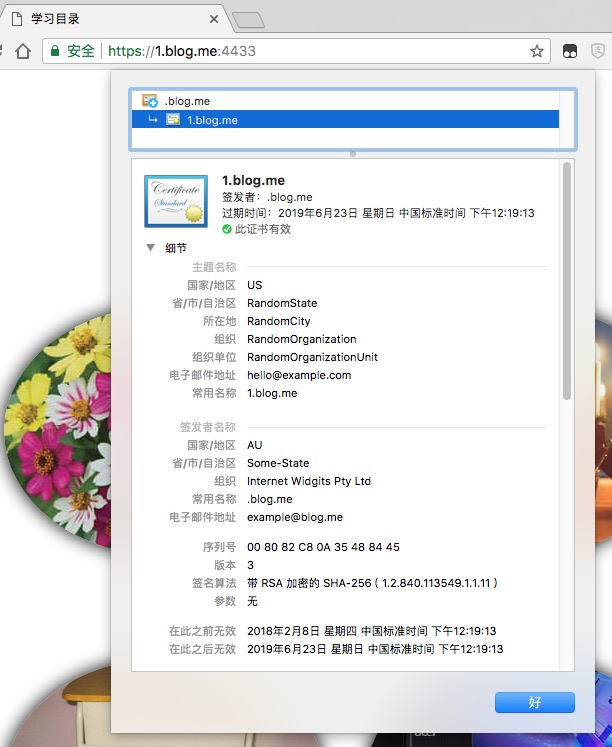
用根 SSL 证书来为本地自定义域名 1.blog.me 专门发行证书。 创建 1.blog.me.csr.cnf 配置文件
[req]
default_bits = 2048
prompt = no
default_md = sha256
distinguished_name = dn

[dn]
C=US
ST=RandomState
L=RandomCity
O=RandomOrganization
OU=RandomOrganizationUnit
[email protected]
CN = 1.blog.me
用此配置 1.blog.me.csr.cnf 来创建证书密钥。该密钥存储在 1.blog.me.key
openssl req -new -sha256 -nodes -out 1.blog.me.csr -newkey rsa:2048 -keyout 1.blog.me.key -config <(cat 1.blog.me.csr.cnf)
Generating a 2048 bit RSA private key .....................................................+++ ....................................................................................................+++ writing new private key to '1.blog.me.key'
创建有 subjectAltName 的配置文件 v3.ext
authorityKeyIdentifier=keyid,issuer
basicConstraints=CA:FALSE
keyUsage = digitalSignature, nonRepudiation, keyEncipherment, dataEncipherment
subjectAltName = @alt_names

[alt_names]
DNS.1 = 1.blog.me
创建域名证书:
openssl x509 -req -in 1.blog.me.csr -CA server.crt -CAkey server.key -CAcreateserial -out 1.blog.me.crt -days 500 -sha256 -extfile v3.ext
Signature ok subject=/C=US/ST=RandomState/L=RandomCity/O=RandomOrganization/OU=RandomOrganizationUnit/[email protected]/CN=1.blog.me Getting CA Private Key
修改 nginx.conf 中的证书和密钥项:
...
        ssl_certificate      1.blog.me.crt;
        ssl_certificate_key  1.blog.me.key;
...
重启 nginx:
brew services restart nginx
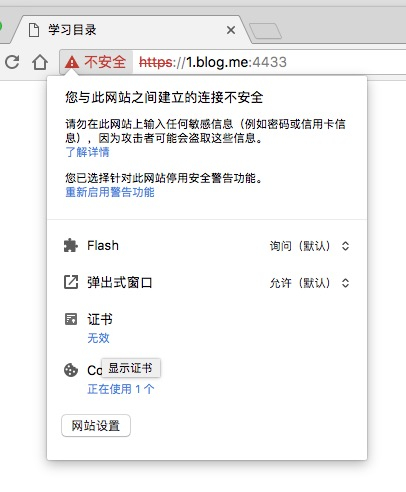
Chrome 中再次打开:https://1.blog.me:4433 PERFECT!
优点
- 通过http://localhost:3000 也能访问本地开发服务器
- puma 在 http 模式下更少出错
- 测试方便
- 真实的产品服务器也可以这样开启 https
- 开发服务器可以与产品服务器使用相同的域名(别忘了用 SwitchHost 切换),申请到的 SSL 证书也能用于开发 (好处是不需要添加信任)