Rails Rails 中使用 CoffeeScript 集成 Simditor 与 ActiveStorage 的正确姿势
找 Rails 靠谱的编辑器是不是找了好久了?别找了,就用Simditor吧。
要如何在 Rails 中完美集成这样一个简洁大气又好用的编辑器呢?我们都知道,在高版本的 Rails 中使用 CoffeeScript 已经成为了一种习惯。所以本文将以 CoffeeScript 作为粘合剂来演示如何集成 Simditor 编辑器到 Rails 应用中,同时采用 Rails 原生的 ActiveStorage 作为上传支撑。
事先声明下我的环境配置:
Ruby: ruby 2.4.1p111 (2017-03-22 revision 58053) [x86_64-linux]
Rails: Rails 5.2.2
1. 准备工作
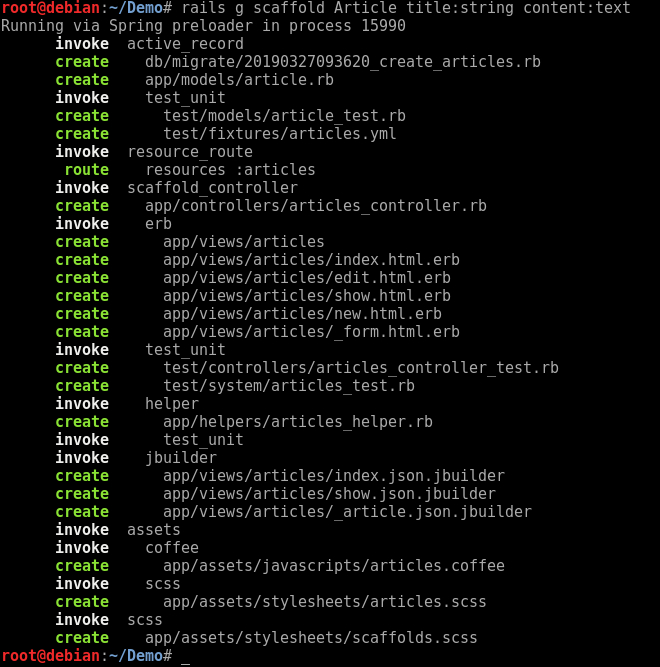
首先我们新建一个 Rails 项目,在命令行中,运行rails new Demo,待工程创建好以后我们进入 Demo 目录,新建一个脚手架。这里我们就以 Article 作为脚手架的名字,运行rails g scaffold Article title:string content:text
创建好之后,运行rails db:migrate,迁移数据库

此时,将 simeditor 添加到 Gemfile 中。修改 Gemfile,加入以下内容并执行 bundle(simditor 需要 jquery 的支持)。
gem 'jquery-rails'
gem 'simditor'
并在 app/assets/javascripts/application.js 中加入 simditor 的引用,此处需要注意,下面两行代码需要添加在//= require_tree这行代码之前,否则会出错。
//= require jquery
//= require simditor
//= require_tree .
同时需要在 app/assets/stylesheets/application.css 中加入 simditor 的样式文件:
*= require simditor
启动 Rails 应用,在浏览器中访问/articles/new,此时的界面如下:
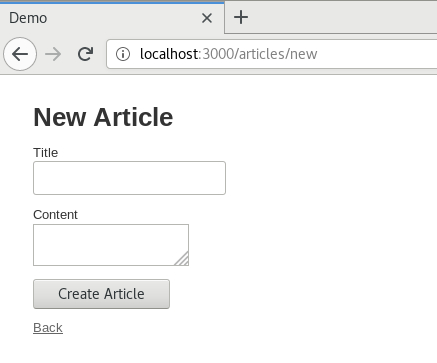
到这里,准备工作就完成了。
2. 修改编辑框,集成 Simditor
按照 Rails 的命名惯例,此处编辑框 textarea 的 ID 是 article_content,我们的 CoffeeScript 脚本中,则需用选择器来绑定这个 text_area。
修改 app/assets/javascripts/article.coffee,加入以下内容:
$(document).on "turbolinks:load", ->
    editor = new Simditor(
        textarea: $('#article_content')
        toolbar: [ 'bold', 'italic', 'underline', 'strikethrough', 'color',
            'code', 'blockquote', 'link', 'image', 'ol', 'ul', 'table', 'indent','outdent','alignment']
        pasteImage: true,
        fileKey: 'file',
        upload: {
            url: '/images',
            params: {"content":"image"},
            connectionCount: 3,
            leaveConfirm: '有图片正在上传,确定要离开?'
    })
再次在浏览器中访问/articles/new,界面变成了这样:
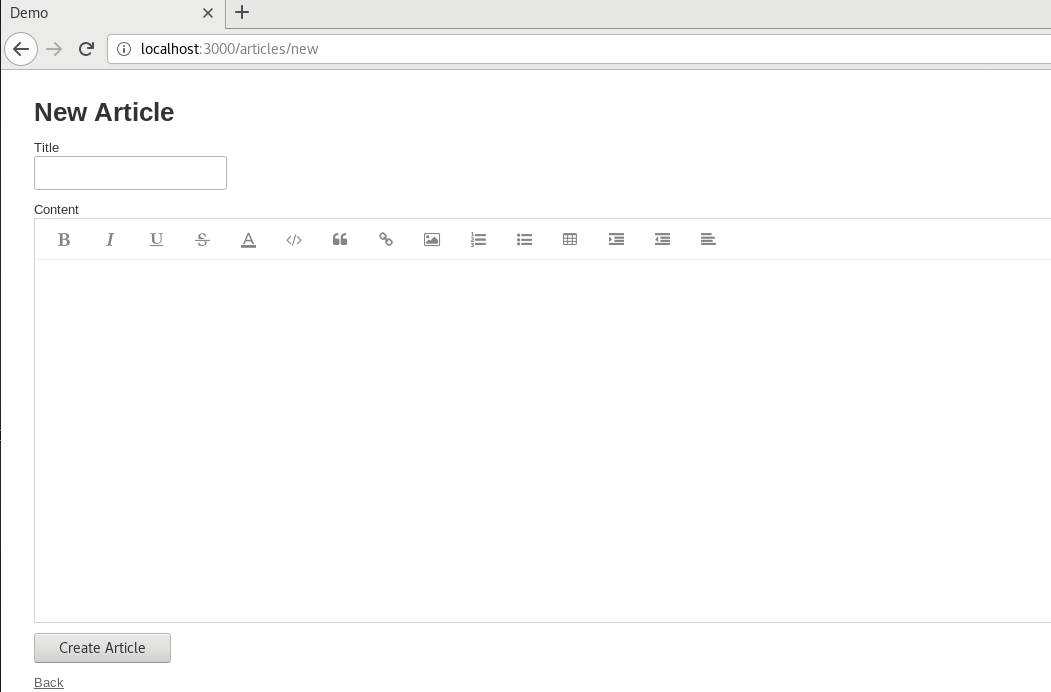
此时 Simditor 已经集成到了应用中了。
3. 使用 ActiveStorage 配置上传功能
ActiveStorage 是 Rails 5.2 以后推出的用于专门管理 Web 上传内容的组件,和 ActiveRecord 一样,是一个很方便同时又很强大的 Rails Web 开发组件。想要集成基于 ActiveStorage 的上传功能,首先要在我们的应用中安装 ActiveStorage:
运行rails active_storage:install然后再运行rails db:migrate:
root@debian:~/Demo# rails active_storage:install
Copied migration 20190327123314_create_active_storage_tables.active_storage.rb from active_storage
root@debian:~/Demo# rails db:migrate
== 20190327123314 CreateActiveStorageTables: migrating ========================
-- create_table(:active_storage_blobs)
   -> 0.0050s
-- create_table(:active_storage_attachments)
   -> 0.0027s
== 20190327123314 CreateActiveStorageTables: migrated (0.0086s) ===============
迁移完成以后,我们新建一个 Upload 控制器,使用rails g controller Upload命令生成它。修改 Upload 控制器代码,位于 app/controllers/upload_controller.rb,添加一个 upload 方法:
#app/controllers/upload_controller.rb
class UploadController < ApplicationController

  skip_before_action :verify_authenticity_token, :only => [:upload]

  def upload

    puts "*"*64
    puts params

    blob = ActiveStorage::Blob.create_after_upload!(
      io: params[:image],
      filename: params[:image].original_filename,
      content_type: params[:image].content_type
    )

    if blob.save
      success = true
      msg = 'upload success'
    else
      success = false
      msg = "upload error"
    end

    render json: { :success=> success, :msg=>msg, :file_path=> rails_blob_path(blob) }

  end

end
修改路由配置文件,指定我们的上传路由:
#config/routes.rb
Rails.application.routes.draw do
  post 'images/upload' => 'upload#upload'
  resources :articles
  root to: 'articles#index'
  # For details on the DSL available within this file, see http://guides.rubyonrails.org/routing.html
end
还要稍微修改一下我们的 articles.coffee 文件,改一下其中的上传路径和参数,用于 Ajax 提交图片:
//app/assets/javascripts/articles.coffee
$(document).on "turbolinks:load", ->
    editor = new Simditor(
        textarea: $('#article_content')
        toolbar: [ 'bold', 'italic', 'underline', 'strikethrough', 'color',
            'code', 'blockquote', 'link', 'image', 'ol', 'ul', 'table', 'indent','outdent','alignment']
        pasteImage: true,
        fileKey: 'file',
        upload: {
            url: '/images/upload', //<==上传接口
            fileKey: 'image', //<=参数名称
            params: {"content":"image"},
            connectionCount: 3,
            leaveConfirm: '有图片正在上传,确定要离开?'
    })
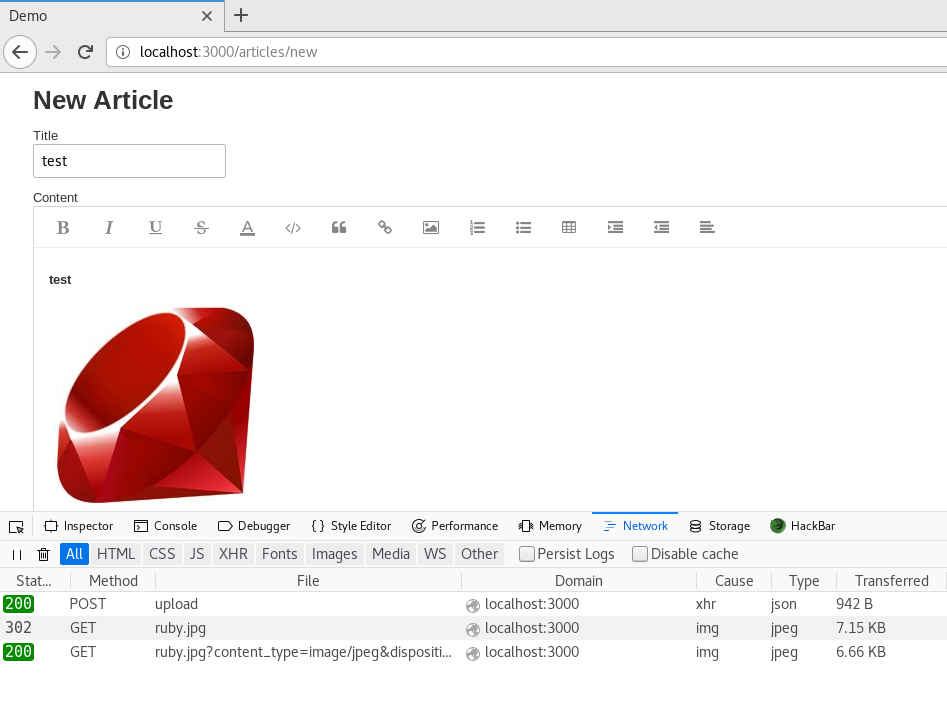
至此,已经可以在页面中正常地上传文件了,也可以直接从粘贴板复制文件,Simditor 会自动上传文件:
本文涉及到的代码已经上传到 Github,仓库链接:https://github.com/Chorder/RailsSimditorActiveStorageDemo
本文同步发表于我的博客https://chorder.net/2019/03/27/rails-simditor-activestorage/,转载请注明来源。
 。前端可选择的编辑器实在太多了,Markdown 的话
