Gem RoleCore —— 快速构建定制化的 RBAC 系统
项目地址:https://github.com/rails-engine/role_core (文档可能已经有更新,以 repo 内的为准)
RoleCore 是什么?
即使是基于 RBAC 的访问控制系统,根据项目的需要,以下考量也会影响到设计:用户可拥有单角色或者多角色?角色是否能够继承?角色是否涉及 Scope(一般出现在多租户应用中)?是否混合 ABAC(Attribute Based Access Control)?
如同和上一集的 FormCore ,RoleCore 并没有提供开箱即用的方案,仅提供了用于实现 RBAC 系统的最小公共需求,遵从了 Improving engine functionality 使其易于被扩展,以此帮助你快速构建恰好满足项目需要的访问控制系统。
RoleCore 也没有实现请求的访问控制,因为 CanCanCan、Pundit 已经经过社区多年的验证,包括其用法也是深入人心。访问控制是一个比较敏感的功能,实现这部分首先要增加很多的工作量,配套的要补充大量测试以证明其安全,此外,用户还要学习 RoleCore 提供的 Helper 和 使用方式。所以,不妨提供一种机制,能够让用户选择喜欢的访问控制库。
此外,他同样利用了“运行时构造模型类”(在我的 FormCore 的介绍文章中有介绍)的技巧,使得前端的工作量大大减少,也更容易做 i18n。
RoleCore 提供了:
- Role 模型,用于储存角色名称以及角色所拥有的权限的持久化记录
- 仿照 Redmine 的风格的用于声明权限的 DSL(参考:Redmine 的权限声明)
- 一个权限描述基类 用来接入已有的访问控制系统(如 CanCanCan、Pundit)
Demo
Dummy 即为 demo,预览方式参考 Readme#demo,这里演示了一个简单的任务管理应用(Project has many Tasks),用户可以拥有多个权限,访问控制使用 CanCanCan。
下文也将以此作为演示。
使用(基于 RoleCore 的 dummy app)
安装参考 Readme#Installation
创建 RoleCore 的 initializer
运行 bin/rails g role_core:config 在项目的 config/initializers 建立 role_core.rb 用于编写关于 RoleCore 的配置。
编写用于接入访问控制 Gem 的权限描述类
以 CanCanCan 为例,如果你需要和 CanCanCan 集成,以下代码可以直接复制。
当然更好的办法是制作一个 role_core-cancancan gem,这样这一步(也是最难理解的一步)就可以省略了。
RoleCore 提供的 Permission 类 只包含权限的标识(name)和优先级(priority)。
CanCanCan 的 Ability 的 DSL 形如:
user.can :create, Project
user.can :read, Project, is_public: true
user.can :update, Project do |project|
  project.user_id == user.id
end
为了能够集成进 CanCanCan,需要继承 RoleCore::Permission 增加 model 和 block 部分。
在 app/lib(强烈建议建立这个目录,并用它存放 Rails 初始化后才需要的库的代码,可以享受到线程安全的 autoload 和 修改后无需重启应用的好处)或 lib 下建立 can_can_can_permission.rb,代码如下:
class CanCanCanPermission < RoleCore::Permission
  # CanCanCan 的 can 方法的形参 action(即第一个形参)未必和权限的标识一致
  # 考虑 编辑任务 和 编辑我的任务 这种情况
  attr_reader :action, :options

  # 父类定义的构造方法签名
  def initialize(name, priority: 0, **options, &block)
    super # 调用父类的构造方法

    @model = options.fetch(:model) # 从 options 中提取模型信息
    @action = options.fetch(:action) { name } # 若没有提供 action,则使用 name 作为 CanCanCan 需要的 action
    @options = options.except(:model, :action)
    @block = block # 储存传入的 block
  end

  # 基类的签名为 call(context, *) 故除了第一个形参 context 外,可以根据需要增加新的形参
  # context 为 CanCanCan 的 Ability 的实例
  # user 为 Ability 的构造方法的形参 user,即当前用户
  def call(context, user)
    if block_attached?
      # 因为 user 需要在每个请求处理时动态传入(即 call 的同名形参),所以我们要让 block 的第一个形参为 user 以方便注入
      # 故预期的 block 形如:{ |user, project| project.user_id == user.id }
      # 但我们需要 block 拥有 user 的信息以便做判断,但 CanCanCan 的 DSL 里不可以包含这个 user,所以要消去它
      # 于是这里使用了一个 Proc 的技巧 —— 科里化
      context.can @action, @model, &@block.curry[user]
    else
      context.can @action, @model, @options
    end
  end

  def block_attached?
    !!@block
  end
end
然后在 config/initializers/role_core.rb 里指定刚编写的 Permission 类
RoleCore.permission_class = CanCanCanPermission
声明项目所包含的权限
在 config/initializers/role_core.rb 里编写
RoleCore.permission_set_class.draw do
  # group 除了第一个实参外(这里即 `:project` 都将附加到其下的 `permission` 方法调用里)
  group :project, model: Project do
    # 结合 `group` 等价于 `permission :destroy, model: Project`
    permission :destroy
    permission :create, default: true # default 用于声明是否默认拥有该权限
    permission :update
    # 调高优先级,用户拥有这一项权限的时候,保证排序后总在下一个
    # CanCanCan 的特性是,相同的 action,后声明的覆盖先前的
    # 参考 https://github.com/CanCanCommunity/cancancan/wiki/Ability-Precedence
    permission :read, priority: 1, default: true
    # 指定 action 为 :read, 这句将被翻译为 CanCanCan 的 DSL `can :read, Project, is_public: true`
    permission :read_public, action: :read, is_public: true
  end

  group :task, model: Task do
    permission :create, default: true
    permission :destroy
    permission :update, priority: 1

    permission :update_my_own, action: :update, default: true do |user, task|
      task.user_id == user.id
    end
  end
end.finalize! # finalize! 可选,意思是冻结权限声明
将 Role 和项目的“用户”挂钩
这里演示的是 User 可以有多个 Role 的情况,即多对多关系。
需要增加关联模型(迁移省略)
class RoleAssignment < ApplicationRecord
  belongs_to :user
  belongs_to :role

  validates :role,
            uniqueness: {scope: :user}
end
RoleCore::Role 已经做了 STI 支持,故可以在项目端实现 Role 模型,扩展新的行为
class Role < RoleCore::Role
  has_many :role_assignments, dependent: :destroy
  has_many :users, through: :role_assignments
end
用户(User)端代码省略
在 CanCanCan 的 Ability 中释放我们刚做的的权限定义
由于我们是用户可以对应多个角色,故需要先合并所有角色的权限,可以在 User 模型中编写如下方法
def permitted_permissions
  # role 的 permitted_permissions 方法返回去过重的排过序的 CanCanCanPermission 对象
  # 这里我们得到所有角色的 permitted_permissions 后重新做去重和排序,才能保证结果正确
  roles.map(&:permitted_permissions).flatten.uniq.sort_by(&:priority)
end
CanCanCan 的 app/models/ability.rb 中只需要编写两行即可
class Ability
  include CanCan::Ability

  def initialize(user)
    # See the wiki for details:
    # https://github.com/CanCanCommunity/cancancan/wiki/Defining-Abilities

    # 遍历我们去重、排序过的用户拥有的权限集合
    user.permitted_permissions.each do |permission|
      # 调用我们之前实现的 call 方法
      permission.call(self, user)
    end
  end
end
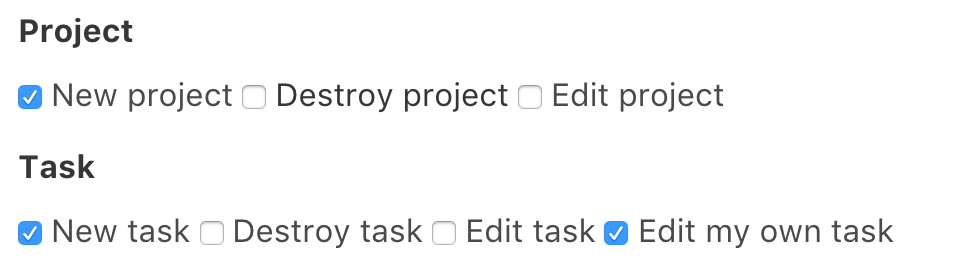
角色的权限管理界面
Demo 使用了 Bulma CSS 框架,仅需 22 行即可达到如图效果:
i18n
略,参见 https://github.com/rails-engine/role_core/blob/master/test/dummy/config/locales/role_core.en.yml

 好吧
好吧